To free data scientists from worrying about the performance when developing a new model, hardware backend providers (e.g., Intel, NVIDIA, ARM, etc) either provide kernel libraries such as cuBLAS or cuDNN with many commonly used deep learning kernels, or provide frameworks such as DNNL or TensorRT with a graph engine to let users describe their models in a certain way to achieve high performance. In addition, emerging deep learning accelerators also have their own compilers, kernel libraries, or runtime frameworks.
However, users have to learn a new programming interface when they attempt to work on a new kernel library or a device. As a result, the demand for a unified programming interface becomes more and more important to let all users and hardware backend providers stand on the same page.
To share the programming interface with widely used deep learning frameworks, many hardware device providers have attempted to integrate their devices backend to TensorFlow. However, since TensorFlow does not provide an official backend interface for new backends, you have to hack the TensorFlow for registration, which involves many source file changes and makes the future maintenance difficult.
In this post, we demonstrate how you, as a hardware backend provider, can easily leverage the Bring Your Own Codegen (BYOC) framework to integrate the kernel library/compiler/framework of your hardware device to TVM. The most important advantage of leveraging BYOC framework is that all related source files of your devices are self-contained, so the codegen/runtime of your devices are pluggable to the TVM code base. It means that 1) the TVM code base with your codegen would be upstream compatible, and 2) TVM users can choose to enable the codegen/runtime based on their needs.
In the rest of this post, we first illustrate a scenario that you may need TVM with BYOC, followed by an overview of the BYOC compilation and runtime flows. Then, we step-by-step illustrate how to integrate a vendor library or an execution engine to TVM with BYOC by using Intel DNNL (a.k.a. MKL-DNN, OneDNN) as a running example.
Bring an ASIC Accelerator to TVM
Let’s first make a scenario to illustrate why you want to bring your accelerator to TVM and what features you can expect from the BYOC framework. If you are not sure whether your case is suitable for BYOC, you are welcome to raise a discussion at discuss.tvm.ai.
Imagining that you just made an edge device platform with an ARM CPU and a fantastic accelerator that has achieved amazing performance for common image classification models. In other words, your accelerator does well on Conv2D, ReLU, GEMM, and other widely used CNN operators.
Unfortunately, object detection models are getting more and more popular as well, and your customers need to run both image classification and object detection models on your platform. Although your accelerator is capable of executing almost all operators in object detection models, one operator (e.g., non-maximum suppression, NMS) is missing.
Let TVM execute unsupported operators
Since TVM has multiple codegens for different backends, it is easy for the open source community to implement new operators on CPU or GPU in a short time. Ideally, if you integrate the compilation flow of your accelerator to TVM with BYOC, TVM will perform Relay graph partitioning to offload a part of the graph to your accelerator while keeping others on TVM. As a result, you can claim that your platform is capable of running all models without worrying about new operators.
Customize graph-level optimization
Your ASIC accelerator must have its own compilation flow. Usually, it could be one of the following cases:
Generate a graph representation and feed it to a graph engine: You may have your own graph engine that is capable of executing a graph (or a neural network model) on your accelerator. For example, both Intel DNNL and NVIDIA TensorRT use an engine to run a whole graph or a model, so that they are able to 1) reduce memory transaction between operators and 2) optimize graph execution with operator fusion.
In order to achieve the above two optimizations, you may need to process the graph during the compilation time. For example, Conv2D and bias addition are two separate operators in TVM, but they may be one operator (Conv2D with bias addition capability) on your accelerator. In this case, you may want to optimize the graph by replacing the conv2d - add graph pattern to a your_conv2d_with_bias node.
If your compilation flow falls into this case, then we recommend reading all the rest sections in this post but skipping Bring DNNL to TVM: C Source Codegen.
Generate assembly code and compile it to an executable binary: If you do not have an end-to-end execution framework for your platform like the previous case, you may have a compiler to compile a program in assembly code of your ISA. In order to feed the assembly code to your compiler, you will need a codegen to generate and optimize the assembly code from a Relay graph.
If your compilation flow falls into this case, then we recommend reading all the rest sections in this post but skipping Bring DNNL to TVM: JSON Codegen/Runtime.
How BYOC Works
We then briefly explain how BYOC framework works. For more detail explanations of underlying framework components and their implementations, please refer to the developer document. In short, given a Relay graph in Figure 1, BYOC framework does the following steps:
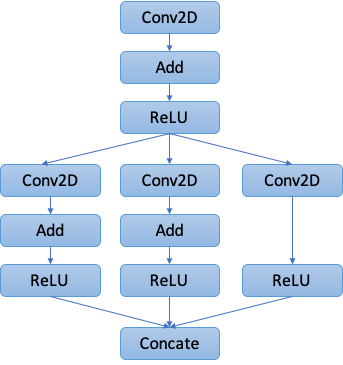
1. Graph Annotation
Taking a user-provided Relay graph, our first step is to annotate the nodes that potentially can be offloaded to your accelerator in the graph. You will need to follow Bring DNNL to TVM: Annotation Rules to implement a whitelist of supported operators, or a graph pattern list of customized composite operators. An example annotation result is shown in Figure 2.
2. Graph Transformation
The second step is to transform and optimize the graph based on the annotations. Specifically, BYOC performs the following transformations.
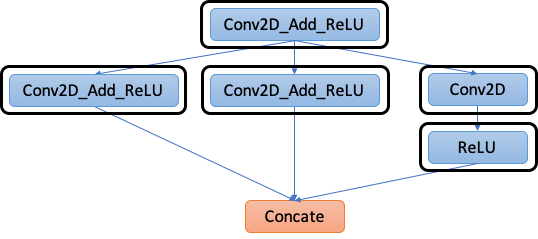
2.1: Merge compiler region: As can be seen in Figure 2, we now have many “regions” in the graph that can be offloaded to your accelerator, but some of them can actually be merged to reduce the data transfer and kernel launching overhead. Accordingly, step 2.1 uses a greedy algorithm to merge as many of those regions as possible while guaranteeing the functional correctness. The result is depicted in Figure 3.

2.2: Partition Graph: For each region from the previous step, we create a Relay function with an attribute Compiler to indicate that this Relay function should be entirely offloaded to your accelerator, as shown in Figure 4.
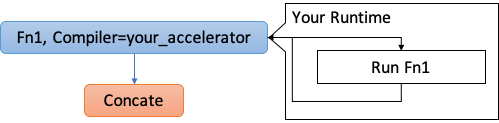
3. Code Generation
Now we know which part of the Relay graph should be offloaded. In this step, we sequentially send every Relay function with Compiler=your_accelerator to your codegen. Your codegen should compile the Relay function to the form that matches your own compilation flow. It can be either C source code or any text formats.
Finally, all compiled functions will be serialized along with other non-offloaded Relay functions to a single .so file by the TVM export_library Python API. In other words, the user will get only one .so file after running this flow.
4. Runtime
You may also need to implement a runtime to initialize your graph engine (if applicable) and execute the compiled functions. During the inference, TVM runtime (i.e., graph runtime or VM) will leverage your runtime to invoke the offloaded functions when the TVM runtime encounters the corresponding function call in Figure 4. Your runtime is responsible for launching the compiled function with the given input tensor arrays and filling in the results to the output tensor arrays.
In the rest of this post, we use DNNL as an example to demonstrate how to achieve the above workflow using the BYOC framework. Please note that all referred code and line number in this post are based on the TVM repository’s master branch commit 8a0249c.
Bring DNNL to TVM: Annotation Rules
The BYOC framework provides two approaches for you to describe the supported operators and patterns. You can use both of them simultaneously. In this section, we use DNNL as an example to show how to make use of them. The complete implementation is available here. Note that we put the annotation rules for your codegen under python/tvm/relay/op/contrib/your_codegen_name.py.
Rules for single operators
You can intuitively specify which Relay operators are supported by your accelerator with the BYOC API. For example, we use the following code snippet to build a rule saying that our DNNL codegen supports Conv2D:
@tvm.ir.register_op_attr("nn.conv2d", "target.dnnl")
def _dnnl_conv2d_wrapper(attrs, args):
  return True
This registers a new attribute target.dnnl to Relay nn.conv2d operator. By this way, the BYOC annotation could invoke target.dnnl() for every operator in the graph to check if it is supported in DNNL codegen.
On the other hand, it might be tedious to write the above code snippet for every single operator. For the DNNL implementation, we implemented a helper function, _register_external_op_helper, to make our life easier:
def _register_external_op_helper(op_name, supported=True):
    @tvm.ir.register_op_attr(op_name, "target.dnnl")
    def _func_wrapper(attrs, args):
        return supported
    return _func_wrapper

_register_external_op_helper("nn.batch_norm")
_register_external_op_helper("nn.conv2d")
_register_external_op_helper("nn.dense")
_register_external_op_helper("nn.relu")
_register_external_op_helper("add")
_register_external_op_helper("subtract")
_register_external_op_helper("multiply")
In the above example, we specify a list of operators that can be supported by DNNL codegen.
Rules for graph patterns
Your accelerator or compiler may have optimized some patterns (e.g., Conv2D + add + ReLU) to be a single instruction or an API. In this case, you can specify a mapping from a graph pattern to your instruction/API. For the case of the DNNL, its Conv2D API already includes bias addition and it allows the next ReLU to be attached, so we can call DNNL as the following code snippet (the complete implementation can be found here):
DNNLConv2d(const bool has_bias = false, const bool has_relu = false) {
  // ... skip ...
  auto conv_desc = dnnl::convolution_forward::desc(
    dnnl::prop_kind::forward_inference,
    dnnl::algorithm::convolution_direct,
    conv_src_md, conv_weights_md, conv_bias_md, conv_dst_md,
    strides_dims, padding_dims_l, padding_dims_r);

  // Attach ReLU
  dnnl::primitive_attr attr;
  if (has_relu) {
    dnnl::post_ops ops;
    ops.append_eltwise(1.f, dnnl::algorithm::eltwise_relu, 0.f, 0.f);
    attr.set_post_ops(ops);
  }

  auto conv2d_prim_desc = dnnl::convolution_forward::primitive_desc(
    conv_desc, attr, engine_);
  // ... skip ...
In this case, except for a single conv2d, we would like to map the graph pattern conv2d+relu to DNNLConv2d(false, true), and map conv2d+add+relu to DNNLConv2d(true, true). We can achieve it with the following code snippet:
def make_pattern(with_bias=True):
  data = wildcard()
  weight = wildcard()
  bias = wildcard()
  conv = is_op('nn.conv2d')(data, weight)
  if with_bias:
    conv_out = is_op('add')(conv, bias)
  else:
    conv_out = conv
  return is_op('nn.relu')(conv_out)

@register_pattern_table("dnnl")
def pattern_table():
  conv2d_bias_relu_pat = ("dnnl.conv2d_bias_relu", make_pattern(with_bias=True))
  conv2d_relu_pat = ("dnnl.conv2d_relu", make_pattern(with_bias=False))
  dnnl_patterns = [conv2d_bias_relu_pat, conv2d_relu_pat]
  return dnnl_patterns
In the DNNL example, we implemented two patterns with different names so that we can easily recognize them in the codegen. Note that the patterns are implemented in the Relay pattern language. You can follow this tutorial to learn how to write your own patterns.
With the pattern table, we can then use a Relay pass to perform the transformation from
%1 = nn.conv2d(%data, %weight, ...)
%2 = add(%1, %bias)
%3 = nn.relu(%2)
to
%1 = fn(%input1, %input2, %input3,
        Composite="dnnl.conv2d_bias_relu",
        PartitionedFromPattern="nn.conv2d_add_nn.relu_") {
  %1 = nn.conv2d(%input1, %input2, ...)
  %2 = add(%1, %input3)
  nn.relu(%2)
}
%2 = %1(%data, %weight, %bias)
Thus, the DNNL codegen can get the pattern name conv2d_bias_relu and map %1 to DNNLConv2d(true, true).
As you may have noticed that we also have an attribute called “PartitionedFromPattern” in the composite function. This could be helpful if your pattern contains wildcard operators. For example we may have a pattern table ("conv2d_with_something", conv2d -> *):
def make_pattern(with_bias=True):
  data = wildcard()
  weight = wildcard()
  conv = is_op('nn.conv2d')(data, weight)
  return wildcard()(conv)
In this case, you will get a composite function with Composite=conv2d_with_something, but you have no idea about what graph it actually matched. That’s where PartitionedFromPattern comes into play. You can know that if the matched graph is conv2d -> add or conv2d -> relu by looking at PartitionedFromPattern to see if it is nn.conv2d_add_ or nn.conv2d_nn.relu_.
Bring DNNL to TVM: Relay Graph Transformation
With the annotation rules from the previous step, we can now apply a list of BYOC Relay passes to transform the Relay graph from Figure 1 to Figure 4:
mod = create_relay_module_from_model() # Output: Figure 1
mod = transform.MergeComposite(pattern_table)(mod)
mod = transform.AnnotateTarget(["dnnl"])(mod) # Output: Figure 2
mod = transform.MergeCompilerRegions()(mod) # Output: Figure 3
mod = transform.PartitionGraph()(mod) # Output: Figure 4
As can be seen, each Relay pass can be mapped to a step we have introduced in How BYOC Works.
Bring DNNL to TVM: JSON Codegen/Runtime
Now let’s implement the DNNL codegen that serializes a Relay graph to a JSON representation, and then implement the DNNL JSON runtime to deserialize and execute the graph. Note that if you attempt to implement a codegen to generate C-compatible programs, you may want to directly proceed to the next section.
To enable DNNL JSON codegen/runtime in TVM to work on this example, please make sure DNNL is available on your machine, and build the TVM with set(USE_DNNL_CODEGEN ON) in config.cmake.
The DNNL codegen is implemented in src/relay/backend/contrib/dnnl/codegen.cc. Since we implemented DNNL codegen in both forms in this file for illustration purpose, you could focus on the part covered by USE_JSON_RUNTIME macro when tracing the code.
We first register the codegen with TVM registration API (L510). This registration makes TVM compile engine dispatch the Relay function with Compiler=<your codegen> to relay.ext.<your codegen>. Then we implement the entry function of the DNNL compiler (L490). Please read the comments embedded in the code snippet for details:
runtime::Module DNNLCompiler(const ObjectRef& ref) {
  // "ref" should be the paritioned Relay function with kCompiler=dnnl.
  CHECK(ref->IsInstance<FunctionNode>());
  auto func = Downcast<Function>(ref);

  // Get the function name as the symbol to match in runtime.
  auto func_name = GetExtSymbol(func);

  // Serialize the function to a JSON string (introduce later).
  DNNLJSONSerializer serializer(func_name, func);
  serializer.serialize();
  std::string graph_json = serializer.GetJSON();

  // The constant tensor names that have been bound to the module.
  // All constant tensors will be serialzied along with the JSON graph
  // when export_library is invoked.
  auto params = serializer.GetParams();

  // The function to create DNNL JSON runtime (introduce later).
  const auto* pf = runtime::Registry::Get("runtime.DNNLJSONRuntimeCreate");
  CHECK(pf != nullptr) << "Cannot find JSON runtime module to create";

  // Create a DNNL runtime module that can run the serialized function.
  auto mod = (*pf)(func_name, graph_json, params);
  return mod;
}
TVM_REGISTER_GLOBAL("relay.ext.dnnl").set_body_typed(DNNLCompiler);
Note that each runtime module is only responsible for one Relay function, meaning that you may have several DNNL runtime modules in a single .so file.
DNNL JSON Serialization
Next, we implement DNNL JSON serializer (L429). We derived it from the BYOC JSON codegen (src/relay/backend/contrib/codegen_json/codegen_json.h). The special process in DNNL JSON serializer attempts to serialize a composite function call to a JSON node that can be interpreted by DNNL JSON runtime. Assuming we have a composite function which matches the pattern dnnl.conv2d_relu, then the BYOC JSON codegen will generate the following JSON node:
{
  op: "kernel",
  name: "dnnl.conv2d_relu",
  inputs: [[0, 0, 0], [1, 0, 0]],
  attrs: {
    PartitionedFromPattern: ["nn.conv2d_nn.relu_"],
    shape: [1, 32, 14, 14]
  }
}
The problem is that we still need the Conv2D attributes such as padding and strides in runtime, but the BYOC JSON serializer only attaches the attributes of the composite function instead of the body operators. On the other hand, the customized DNNL JSON serializer attaches the attributes of the first and only Conv2D in the composite function to generate the following JSON node:
{
  op: "kernel",
  name: "dnnl.conv2d_relu",
  inputs: [[0, 0, 0], [1, 0, 0]],
  attrs: {
    shape: [1, 32, 14, 14],
    data_layout: ["NCHW"],
    kernel_layout: ["OIHW"],
    strides: [1, 1],
    padding: [1, 1, 1, 1]
  }
}
As can be seen from the DNNL JSON serializer, you can customize the serializer to generate any forms in JSON you like as long as your JSON runtime could interpret them.
DNNL JSON Runtime
We then implement a DNNL JSON runtime to interpret and execute the serialized JSON graph. We put it under src/runtime/contrib/dnnl/dnnl_json_runtime.cc.
Again, we first register two APIs to create the runtime so that we can use them anywhere. The runtime.DNNLJSONRuntimeCreate is used in the previous part after serialization, and runtime.module.loadbinary_dnnl_json could be used when loading the .so back.
// Create a DNNL JSON runtime to interpret and execute the given JSON graph.
runtime::Module DNNLJSONRuntimeCreate(String symbol_name, String graph_json,
                                      const Array<String>& const_names) {
  auto n = make_object<DNNLJSONRuntime>(symbol_name, graph_json, const_names);
  return runtime::Module(n);
}
TVM_REGISTER_GLOBAL("runtime.DNNLJSONRuntimeCreate")
    .set_body_typed(DNNLJSONRuntimeCreate);

TVM_REGISTER_GLOBAL("runtime.module.loadbinary_dnnl_json")
    .set_body_typed(JSONRuntimeBase::LoadFromBinary<DNNLJSONRuntime>);
Now we explain DNNL JSON runtime implementation. The basic class structure is:
class DNNLJSONRuntime : public JSONRuntimeBase {
  const  char* type_key() const { return  "dnnl_json"; }
  void Init(const Array<NDArray>& consts) override {
    // Initialize the DNNL graph engine.
    BuildEngine();

    // Setup constants entries for weights.
    CHECK_EQ(consts.size(), const_idx_.size())
      << "The number of input constants must match the number of required.";
    SetupConstants(consts);
  }

  void Run() override {
   // 1. Fill in the input buffers.
   // 2. Invoke the engine through intepreting the stream.
   // 3. Read and fill output buffers.
  }
}
The Init function is in charge of building the DNNL engine by interpreting the JSON graph string (see L93 for BuildEngine), and filling the constant weights to the corresponding data entry buffers (the SetupConstant is implemented in the JSON runtime base class so you only need to invoke it in Init). Note that this function will be called only once even we run multiple times of inferences.
Next, the Run function (L64) first writes the input tensors, which may come from user inputs or constant weights, to the corresponding DNNL memory buffers we initialized when building the DNNL engine. Then launch the DNNL engine to execute the JSON graph. Finally, it writes the DNNL output memory buffers back to the corresponding output tensors.
Since the rest implementation in DNNL JSON runtime are too DNNL specific to be dived into details in this post, we will stop here. We would like to emphasize that while the DNNL JSON runtime is a good reference to start with, your JSON runtime could be fully customized to fit your requirements.
Bring DNNL to TVM: C Source Codegen
Now let’s implement the DNNL codegen that generates C source code which invokes DNNL APIs to execute the Relay graph.Note that if you attempt to implement a codegen to generate other graph representation like in JSON format, you may want to read Bring DNNL to TVM: JSON Codegen/Runtime and skip this section.
To enable DNNL C source codegen in TVM to work on this example, please make sure DNNL is available on your machine, and build the TVM with set(USE_DNNL_CODEGEN C_SRC) in config.cmake.
The DNNL codegen is implemented in src/relay/backend/contrib/dnnl/codegen.cc. Since we implemented DNNL codegen in both forms in this file for illustration purpose, you could focus on the part NOT covered by USE_JSON_RUNTIME macro when tracing the code.
We first register the codegen with TVM registration API (L510). This registration makes TVM compile engine dispatch the Relay function with Compiler=<your codegen> to relay.ext.<your codegen>. Then we implement the entry function of the DNNL compiler (L490):
runtime::Module DNNLCompiler(const ObjectRef& ref) {
  DNNLModuleCodegen dnnl;
  return dnnl.CreateCSourceModule(ref);
}
TVM_REGISTER_GLOBAL("relay.ext.dnnl").set_body_typed(DNNLCompiler);
Note that each runtime module is only responsible for one Relay function, meaning that you may have several DNNL runtime modules in a single .so file.
Then, we derive CSourceModuleCodegenBase to implement DNNLModuleCodegen in L362. While CSourceModuleCodegenBase is in charge of other module level processes such as serialization, we only need to implement the DNNL code generation in the CreateCSourceModule function (L389):
runtime::Module CreateCSourceModule(const ObjectRef& ref) override {
    // Include headers
    // ...skip...
    code_stream_ << "#include <dnnl/dnnl_kernel.h>\n";
    // ...skip...

    // "ref" should be the paritioned Relay function with kCompiler=dnnl.
    CHECK(ref->IsInstance<FunctionNode>());
    auto res = GenDNNLFunc(Downcast<Function>(ref));

    // "code" is the generated C code with DNNL APIs.
    std::string code = code_stream_.str();

    // "res" is a tuple of constant weights (symbols, values).
    // All constant tensors will be serialzied along with the generated C code
    // when export_library is invoked.
    String sym = std::get<0>(res);
    Array<String> variables = std::get<1>(res);

    // Create a CSource module with all above artifacts.
    const auto* pf = runtime::Registry::Get("runtime.CSourceModuleCreate");
    CHECK(pf != nullptr) << "Cannot find csource module to create the external runtime module";
    return (*pf)(code, "c", sym, variables);
  }
Next, we implement GenDNNLFunc (L365) to generate the compilable C code with DNNL APIs as follows. Please see the embedded comments for the explanations of TVM C source runtime module compatible function interfaces.
// The example Relay graph: conv2d -> add -> relu.
#include <cstdint>
#include <cstdlib>
#include <cstring>
#include <vector>
#include <tvm/runtime/c_runtime_api.h>
#include <tvm/runtime/container.h>
#include <tvm/runtime/packed_func.h>
#include <dlpack/dlpack.h>
#include <dnnl/dnnl_kernel.h>
using namespace tvm::runtime;
using namespace tvm::runtime::contrib;

// Execute the conv2d->add->relu graph with DNNL.
extern "C" void dnnl_0_(float* dnnl_0_i0, float* dnnl_0_i1,
                        float* dnnl_0_i2, float* out0) {
  // Allocate intermediate buffers.
  float* buf_0 = (float*)std::malloc(4 * 4608);
  float* buf_1 = (float*)std::malloc(4 * 4608);
  float* buf_2 = (float*)std::malloc(4 * 4608);

  // Pre-implemented op-based DNNL functions.
  dnnl_conv2d(dnnl_0_i0, dnnl_0_i1, buf_0, 1, 32, 14, 14, 32, 1, 0, 0, 3, 3, 1, 1);
  dnnl_add(buf_0, dnnl_0_i2, buf_1, 1, 32, 12, 12);
  dnnl_relu(buf_1, buf_2, 1, 32, 12, 12);

  // Copy the final output to the corresponding buffer.
  std::memcpy(out0, buf_2, 4 * 4608);
  std::free(buf_0);
  std::free(buf_1);
  std::free(buf_2);
}

// The wrapper function with all arguments in DLTensor type.
extern "C" int dnnl_0_wrapper_(DLTensor* arg0,
        DLTensor* arg1,
        DLTensor* arg2,
        DLTensor* out0) {

  // Cast all DLTensor to primitive type buffers and invoke the above
  // execution function.
  dnnl_0_(static_cast<float*>(arg0->data),
  static_cast<float*>(arg1->data),
  static_cast<float*>(arg2->data),
  static_cast<float*>(out0->data));
  return 0;
}

// The TVM macro to generate TVM runtime compatible function "dnnl_0"
// from our generated "dnnl_0_wrapper_".
TVM_DLL_EXPORT_TYPED_FUNC(dnnl_0, dnnl_0_wrapper_);
Note that the pre-implemented op-based DNNL functions are in src/runtime/contrib/dnnl/dnnl.cc.
Since the rest implementation in src/relay/backend/contrib/dnnl/codegen.cc are too DNNL specific to be dived into details in this post, we will stop here. The main idea is implementing a Relay graph visitor (L138) to visit the given Relay function and generate the above C code. As long as your codegen is able to generate the TVM runtime compatible C code, you can fully customize the codegen to fit your requirements.
C Source Compilation
As you may have noticed, the output of DNNLCompiler is a module with the generated C code in text format, which has not been compiled by gcc to be executable binary. In fact, the generated C code will be compiled when users call export_libray(mod), like the following code snippet:
def update_lib(lib):
    # Include the path of src/runtime/contrib/dnnl/dnnl.cc
    test_dir = os.path.dirname(os.path.realpath(os.path.expanduser(__file__)))
    source_dir = os.path.join(test_dir, "..", "..", "..")
    contrib_path = os.path.join(source_dir, "src", "runtime", "contrib")

    # Setup the gcc flag to compile DNNL code.
    kwargs = {}
    kwargs["options"] = ["-O2", "-std=c++14", "-I" + contrib_path]
    tmp_path = util.tempdir()
    lib_name = 'lib.so'
    lib_path = tmp_path.relpath(lib_name)

    # The generated C code with DNNL APIs is compiled to a binary lib.so.
    lib.export_library(lib_path, fcompile=False, **kwargs)

    # Load the lib.so back to a runtime module.
    lib = runtime.load_module(lib_path)
    return lib

with tvm.transform.PassContext(opt_level=3):
    json, lib, param = relay.build(mod, target=target, params=params)
lib = update_lib(lib)
rt_mod = tvm.contrib.graph_runtime.create(json, lib, ctx)
Bring DNNL to TVM: Build TVM with DNNL Codegen/Runtime
Finally, we create cmake/modules/contrib/DNNL.cmake to include the DNNL codegen when building TVM. For demonstration purpose our DNNL codegen has two implementations in the same cmake file. You can only focus on one of them based on your need.
With the cmake file ready, now users can specify set(USE_DNNL_CODEGEN ON) in their build/config.cmake to enable the DNNL codegen.
-
Zhi Chen is a TVM PMC member as well as a senior engineer at SageMaker Neo, Amazon AI, AWS.
-
Cody Yu is a TVM reviewer as well as an applied scientist at Amazon AI, AWS.
Acknowledgment
We would like to thank our colleague Animesh Jain for valuable discussions in the framework design; Tianqi Chen and Jared Roesch from OctoML for system design discussions and prototyping; Masahiro Masuda from the TVM community to help code review and improve the DNNL integration. We would also like to thank Ramana Radhakrishnan, Matthew Barrett, Manupa Karunaratne, and Luke Hutton from ARM, U.K. for contributing several helpful ideas, related Relay passes, and the Arm Compute Library (ACL) integration with BYOC.