Deploy to Adreno GPU
Authors: Daniil Barinov, Egor Churaev, Andrey Malyshev
Introduction
Adreno is a series of graphics processing unit (GPU) semiconductor intellectual property cores developed by Qualcomm and used in many of their SoCs.
The Adreno GPU accelerates the rendering of complex geometries to deliver high-performance graphics and a rich user experience with low power consumption.
This guide will demonstrate the benefits of using textures with Adreno, how to build TVM with OpenCL (needed by Adreno devices) and TVM RPC enabled. It will also provide example code to better understand the differences in compiling and deploying models for Adreno devices.
Advantages of the Textures
One of the Adreno’s advantages is the clever handling of textures. At the moment, TVM is able to benefit from this by having texture support for Adreno. The graph below shows the Adreno A5x architecture.
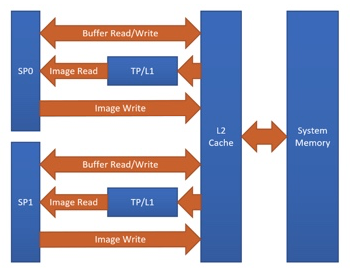
Fig. 1 High-level overview of the Adreno A5x architecture for OpenCL
source: OpenCL Optimization and Best Practices for Qualcomm Adreno GPUs
Reasons of using textures:
Texture processor (TP) has a dedicated L1 cache, which is read-only cache and stores data fetched from level-2 (L2) cache for texture operations (primary reason)
The handling of image boundaries is built-in.
Supports numerous image format and data type combinations with support for automatic format conversions
Overall, with textures, it is possible to achieve a significant performance boost compared to OpenCL buffer based solutions.
Building TVM for Adreno
This section gives instructions on how to build the Android part of TVM with OpenCL and TVM RPC Server in order to deploy models on Adreno.
Since the process of building TVM for Adreno is exactly the same as the process of building TVM for Android, please refer to these instructions: TVM RPC Server.
Since there are many required packages for Android, you can use the official Docker Image to build TVM. For more information refer to this guide: Deploy the Pretrained Model on Android.
Prerequisites: Android NDK and Android Debug Bridge must be installed, the desired device must have OpenCL support and Android part of TVM must be built:
Read documentation about Android NDK installation here: https://developer.android.com/ndk
To get access to adb tools you can see Android Debug Bridge installation here: https://developer.android.com/studio/command-line/adb
You can also build the android part of TVM locally. From the root folder of TVM:
mkdir build_android
cd build_android
cmake .. -DUSE_OPENCL=ON -DCMAKE_TOOLCHAIN_FILE=${ANDROID_NDK_HOME}/build/cmake/android.toolchain.cmake -DANDROID_ABI=arm64-v8a -DANDROID_NATIVE_API_LEVEL=android-28 -DCMAKE_FIND_ROOT_PATH_MODE_PACKAGE=ON -DANDROID_STL=c++_static -DUSE_CPP_RPC=ON
make -jN tvm_runtime tvm_rpc
where N is the number of cores available on your CPU.
At this stage you have built TVM for Adreno.
Build and deploy model for Adreno
In this section we will focus on target, needed to compile and deploy models for Adreno, demonstrate the differences in generated kernels with and without textures and, in addition, the possibility of choosing a different precision for model compilation will be considered.
For the complete step-py-step process of compiling and deploying models on Adreno, including selection of precision, running the inference of the model, getting the predictions, and measuring the performance please refer to this tutorial: How To Deploy model on Adreno
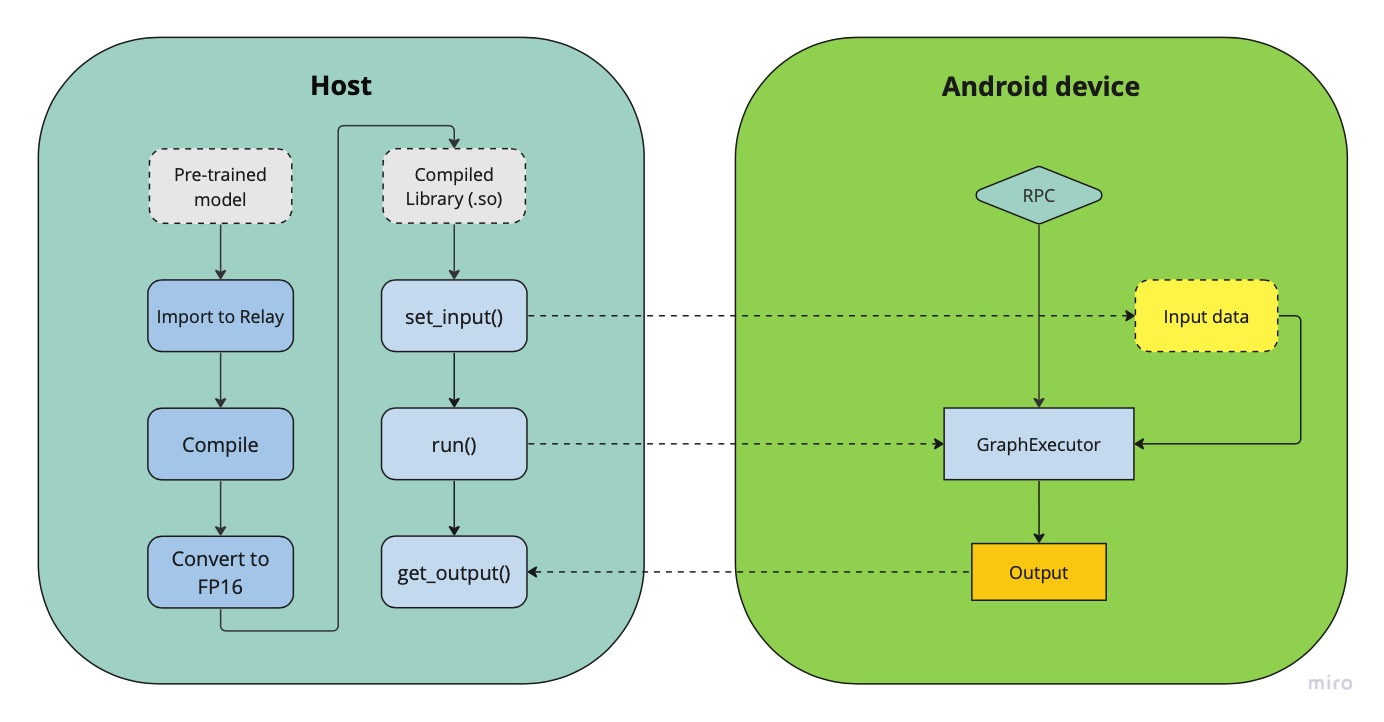
Fig.2 Deployment pipeline on Adreno devices
The figure above demonstrates a generalized pipeline for deploying and running neural network models on android devices. As can be seen from the figure, the compiled model has a set_input() and a run() methods, which prepare the inputs for inference and execute the inference on the remote device using the Graph Executor runtime module.
Adreno target
Normally, when compiling models for Android using OpenCL, the corresponding target is used
target="opencl"
Using Adreno, we want to get all the benefits of textures, so we have to use the following target to generate texture leveraging kernels
target="opencl -device=adreno"
Let’s write a simple model with one convolutional (conv2d) layer and take a look at generated kernels for these two targets
import tvm
from tvm import relay
import numpy as np

input_shape=(1, 56, 56, 32)
filter_shape=(3, 3, 32, 64)
filter = np.random.rand(*filter_shape)

dtype="float32"
input = tvm.relay.var("input", shape=input_shape, dtype=dtype)
weight = tvm.relay.var("weight", shape=filter_shape, dtype=dtype)
D = relay.nn.conv2d(input, weight, padding=(1, 1), data_layout="NHWC", kernel_layout="HWIO", out_dtype=dtype)

mod = relay.Function([input, weight], D)
params = {
   "weight": tvm.nd.array(filter)
}
Now compile our model with the classic OpenCL target and print its modules:
target="opencl"

with tvm.transform.PassContext(opt_level=3):
   graph, lib, params = relay.build_module.build(mod, target, params=params)
print(lib.imported_modules[0].get_source())
Notice that the generated convolution kernel has pointers in the initialization of the function. The kernels generated with the above target are buffer-based.
__kernel void tvmgen_default_fused_nn_conv2d_kernel0(__global float* restrict p0, __global double* restrict p1, __global float* restrict conv2d_nhwc) {
// body..
Now take a look at “opencl -device=adreno” target:
target="opencl -device=adreno"

with tvm.transform.PassContext(opt_level=3):
   graph, lib, params = relay.build_module.build(mod, target, params=params)
print(lib.imported_modules[0].get_source())
The kernels generated this way is actually working with 2d arrays, leveraging textures
__kernel void tvmgen_default_fused_nn_conv2d_kernel0(__write_only image2d_t pad_temp_global_texture, __read_only image2d_t p0) {
// body..
image2d_t is a built-in OpenCL types that represents two-dimensional image object and provides several additional functions. When we use image2d_t we read 4 elements at one time, and it helps to utilize hardware in a more efficient way.
Precisions
The right choice of precision for a specific workload can greatly increase the efficiency of the solution, shifting the initial balance of precision and speed to the side that is a priority for the problem.
We can choose from float16, float16_acc32 (Mixed Precision), float32 (standard).
Float16
To leverage the GPU hardware capabilities and utilize the benefits of half precision computation and memory management, we can convert an original model having floating points operation to a model operating with half precision. Choosing lower precision will positively affect the performance of the model, but it may also have a decrease in the accuracy of the model. To do the conversion you need to write a simple conversion function and specify the dtype value of “float16” before calling the function:
def  convert_to_dtype(mod, dtype):
   # downcast to float16
   if  dtype == "float16":
      global  conv2d_acc = "float16"
      from  tvm.ir  import  IRModule
      mod = IRModule.from_expr(mod)
      seq = tvm.transform.Sequential(
         [
               relay.transform.InferType(),
               relay.transform.ToMixedPrecision()
         ]
      )
      with  tvm.transform.PassContext(opt_level=3):
         mod = seq(mod)
   return  mod

dtype="float16"
mod = convert_to_dtype(mod["main"], dtype)
We then can compile our model in any convinient way
with  tvm.transform.PassContext(opt_level=3):
    lib = relay.build(
        mod, target_host=target_host, target=target, params=params
    )
float16_acc32 (Mixed Precision)
ToMixedPrecision pass traverse over the network and split network to clusters of ops dealing with float or float16 data types. The clusters are defined by three types of operations: - Operations always be converted into float16 data type - Operations which can be converted if they follow by converted cluster - Operations never be converted to the float16 data type This list is defined in the ToMixedPrecision implementation here relay/transform/mixed_precision.py and can be overridden by user
In some cases, we want higher precision in accumulation than the input data.
This is supported, for example, for conv2d and dense operations. To override accumulation type you need to register
function with @register_mixed_precision_conversion decorator to modify parameters of ToMixedPrecision conversion
from  tvm.relay.op  import  register_mixed_precision_conversion

conv2d_acc = "float32"

# Pick a priority > 10 to overwrite defaults, higher priorities take precedence
@register_mixed_precision_conversion("nn.conv2d", level=11)
def  conv2d_mixed_precision_rule(call_node: "relay.Call", mixed_precision_type: str):
    global  conv2d_acc
    return [
        # always do main calculation in mixed_precision_type
        relay.transform.mixed_precision.MIXED_PRECISION_ALWAYS,
        # the dtype for the accumulator
        conv2d_acc,
        # the output dtype for the operation (usually fp16)
        mixed_precision_type,
    ]

# Same for dense
@register_mixed_precision_conversion("nn.dense", level=11)
def  conv2d_mixed_precision_rule(call_node: "relay.Call", mixed_precision_type: str):
    global  conv2d_acc
    return [
        relay.transform.mixed_precision.MIXED_PRECISION_ALWAYS,
        conv2d_acc,
        mixed_precision_type,
    ]
Now we need to modify the conversion function by adding some logical “forks” and ToMixedPrecision() call, then create a Relay graph from desired model in any convinient way and obtain mod (which is IR representation of the model), after which we can convert it to the required dtype and then assemble our model sequentialy
def  convert_to_dtype(mod, dtype):
    # downcast to float16
    if  dtype == "float16"  or  dtype == "float16_acc32":
        global  conv2d_acc
        conv2d_acc = "float16"  if  dtype == "float16"  else  "float32"
        from  tvm.ir  import  IRModule
        mod = IRModule.from_expr(mod)
        seq = tvm.transform.Sequential(
            [
                relay.transform.InferType(),
                relay.transform.ToMixedPrecision()
            ]
        )
        with tvm.transform.PassContext(
             config={"relay.ToMixedPrecision.keep_orig_output_dtype": True},
             opt_level=3):
         mod = seq(mod)
    return  mod

dtype="float16_acc32"
mod = convert_to_dtype(mod["main"], dtype)
dtype = "float32"  if  dtype == "float32"  else  "float16"
The ToMixedPrecision method is a pass to convert an FP32 relay graph into an FP16 version (with
FP16 or FP32 accumulation dtypes). Doing this transformation is useful for reducing model size
as it halves the expected size of the weights (FP16_acc16 case).
From this point onwards, we can compile our model as normal
with  tvm.transform.PassContext(opt_level=3):
    lib = relay.build(
        mod, target_host=target_host, target=target, params=params
    )