Deploy to Adreno™ GPU
Authors: Daniil Barinov, Egor Churaev, Andrey Malyshev, Siva Rama Krishna
Introduction
Adreno™ is a series of graphics processing unit (GPU) semiconductor intellectual property cores developed by Qualcomm and used in many of their SoCs.
The Adreno™ GPU accelerates the rendering of complex geometries to deliver high-performance graphics and a rich user experience with low power consumption.
TVM supports deep learning acceleration on Adreno™ GPU by native OpenCL backend of TVM and also through OpenCLML backend. Native OpenCL backend of TVM is enhanced to make it Adreno™ friendly by incorporating texture memory usage and Adreno™ friendly layouts. OpenCLML is an SDK release by Qualcomm that provides kernel acceleration library for most of the deep learning operators.
This guide is organized to demonstrate various design aspects of
OpenCL Backend Enhancements
OpenCL backend of TVM is enhanced to take advantage of Adreno™ specific features like - Texture memory usage. - Adreno™ friendly activation layouts. - Brand new schedules to accelerate with above features.
One of the Adreno™’s advantages is the clever handling of textures. At the moment, TVM is able to benefit from this by having texture support for Adreno™. The graph below shows the Adreno™ A5x architecture.
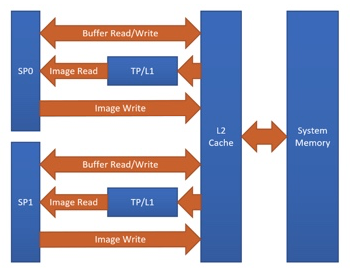
Fig. 1 High-level overview of the Adreno™ A5x architecture for OpenCL
source: OpenCL Optimization and Best Practices for Qualcomm Adreno™ GPUs
Reasons of using textures:
Texture processor (TP) has a dedicated L1 cache, which is read-only cache and stores data fetched from level-2 (L2) cache for texture operations (primary reason)
The handling of image boundaries is built-in.
Supports numerous image format and data type combinations with support for automatic format conversions
Overall, with textures, it is possible to achieve a significant performance boost compared to OpenCL buffer based solutions.
In general we specify target as target="opencl" for a regular OpenCL based target which generates the kernels as shown below.
__kernel void tvmgen_default_fused_nn_conv2d_kernel0(__global float* restrict p0, __global double* restrict p1, __global float* restrict conv2d_nhwc) {
// body..
Above OpenCL kernel definition has __global float* poniters which are essestially OpenCL buffer objects.
When enabled texture based enhancements by modifying target definition as target="opencl -device=adreno" we can see the generated
kernels using texture backed OpenCL image objects as shown below.
__kernel void tvmgen_default_fused_nn_conv2d_kernel0(__write_only image2d_t pad_temp_global_texture, __read_only image2d_t p0) {
// body..
image2d_t is a built-in OpenCL types that represents two-dimensional image object and provides several additional functions. When we use image2d_t we read 4 elements at one time, and it helps to utilize hardware in a more efficient way.
Please refer to Advanced Usage for more details about generation and inspection of kernel sources.
About OpenCLML
OpenCLML is a SDK released by Qualcomm that provides accelerated deep learning operators.
These operators are exposed as an extension cl_qcom_ml_ops to standard OpenCL specification.
Please refer Accelerate your models with our OpenCL ML SDK for more details.
OpenCLML is integrated into TVM as a BYOC solution. OpenCLML operators can use same context and can be enqueued on same command queue as used in native OpenCL. We took advantage of this to avoid any context switching over heads while fallback to native OpenCL.
TVM for Adreno™
This section gives instructions about various ways of building and deploying model to Adreno™ target. Adreno™ is a remote target which is connected to the host via ADB connection. Deploying the compiled model here require use some tools on host as well as on target.
TVM has simplified user friendly command line based tools as well as developer centric python API interface for various steps like auto tuning, building and deploying.
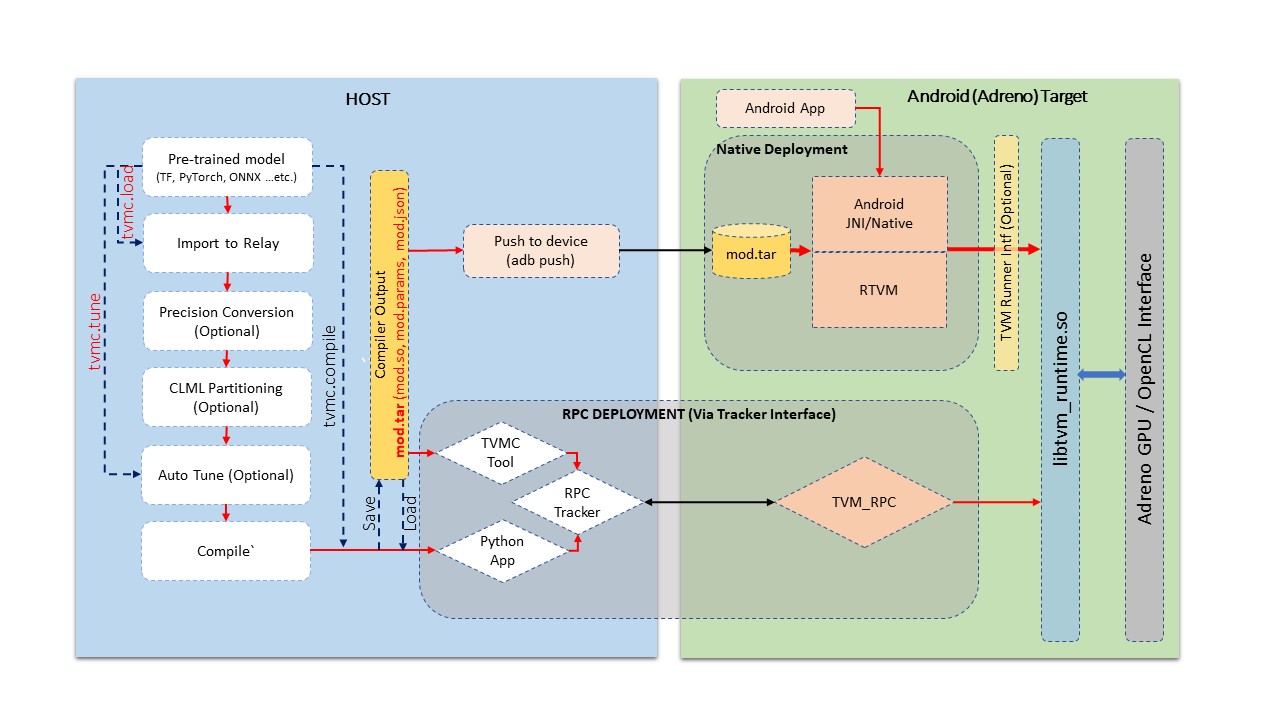
Fig.2 Build and Deployment pipeline on Adreno devices
The figure above demonstrates a generalized pipeline for various stages listed below.
Model import: At this stage we import a model from well known frameworks like Tensorflow, PyTorch, ONNX …etc. This stage converts the given model into TVM’s relay module format. Alternatively one can build a relay module manually by using TVM’s operator inventory too. TVM module generated here is a target independent representation of the graph.
Auto Tuning: At this stage we tune the TVM generated kernels specific to a target. Auto tuning process requires target device availability and in case of a remote target like Adreno™ on Android device we use RPC Setup for communication. Later sections in this guide will detail about RPC Setup for Android device. Auto tuning is not a necessary step for compilation of a model. It is necessary for acheiving best performance out of TVM generated kernels.
Compilation: At this stage we compile the model for specific target. Given we auto tuned the module in previous stage, TVM compilation make use of the tuning log for genetrating best performing kernels. TVM compilation process produces artifacts containing kernel shared lib, graph definition in json format and parameters binary file in TVM specific format.
Deploy (or test run) on Target: At this stage we run the TVM compilation output on the target. Deployment is possible from python environment using RPC Setup and also using TVM’s native tool which is native binary cross compiled for Android. At this stage we can run the compiled model on Android target and unit test output correctness and performance aspects.
Application Integration: This stage is all about integrating TVM compiled model in applications. Here we discuss about interfacing tvm runtime from Android (cpp native environment or from JNI) for setting input and getting output.
Advanced Usage: This section advanced user interests like viewing generated source code, altering precision of the module …etc.
This tutorial covers all the above aspects as part of below sections.
Development Environment Setup : Automatic
TVM ships a predefined docker container environment with all prerequisites to get started quickly. You may also refer to Manual Environment Setup for more control on the dependencies.
For docker setup the pre requisite is just docker tool availabilty on host.
Below commands can build a docker image for adreno.
./docker/build.sh ci_adreno
docker tag tvm.ci_adreno ci_adreno
Now we can build both host and target utils with below command.
./tests/scripts/ci.py adreno -i
To build TVM with OpenCLML SDK we need export the OpenCLML SDK as shown below while building
export ADRENO_OPENCL=<Path to OpenCLML SDK>
./tests/scripts/ci.py adreno -i
On successful compilation this leaves us into a docker shell. The build leaves two folders
build-adreno: The host side TVM compiler build.
build-adreno-target : Contains the android target components
libtvm_runtime.so : TVM runtime library
tvm_rpc : The rpc runtime environment tool
rtvm : A native stand alone tool
While using docker environment the android device is shared with host. Hence, it is required
to have adb version 1.0.41 on the host as the docker used the same version.
We can check adb devices availability inside docker environment too.
user@ci-adreno-fpeqs:~$ adb devices
List of devices attached
aaaabbbb     device
ccccdddd     device
Development Environment Setup : Manual
Manual build process require building of host and target components.
Below command will configure the build the host compiler
mkdir -p build
cd build
cp ../cmake/config.cmake .

# Enable RPC capability to communicate to remote device.
echo set\(USE_RPC ON\) >> config.cmake
# We use graph executor for any host(x86) side verification of the model.
echo set\(USE_GRAPH_EXECUTOR ON\) >> config.cmake
# Enable backtrace if possible for more ebug information on any crash.
echo set\(USE_LIBBACKTRACE AUTO\) >> config.cmake
# The target_host will be llvm.
echo set\(USE_LLVM ON\) >> config.cmake
Additionally we can push below config entry to compile with OpenCLML support.
export ADRENO_OPENCL=<Path to OpenCLML SDK>
echo set\(USE_CLML ${ADRENO_OPENCL}\) >> config.cmake
now we can build as shown below
cmake ..
make
Finally we can export python path as
export PYTHONPATH=$TVM_HOME/python:${PYTHONPATH}
python3 -c "import tvm" # Verify tvm python package
Now, we can configure and build the target components with below configuration Target build require Android NDK to be installed.
Read documentation about Android NDK installation here: https://developer.android.com/ndk
To get access to adb tools you can see Android Debug Bridge installation here: https://developer.android.com/studio/command-line/adb
mkdir -p build-adreno
cd build-adreno
cp ../cmake/config.cmake .
# Enable OpenCL backend.
echo set\(USE_OPENCL ON\) >> config.cmake
# Enable RPC functionality.
echo set\(USE_RPC ON\) >> config.cmake
# Build tvm_rpc tool that runs on target device.
echo set\(USE_CPP_RPC ON\) >> config.cmake
# Build native rtvm deploy tool.
echo set\(USE_CPP_RTVM ON\) >> config.cmake
# We use graph executor for deploying on devices like Android.
echo set\(USE_GRAPH_EXECUTOR ON\) >> config.cmake
# Backtrace enablement if possible.
echo set\(USE_LIBBACKTRACE AUTO\) >> config.cmake
# Adreno supports 32bit alignment for OpenCL allocations rather 64bit.
echo set\(USE_KALLOC_ALIGNMENT 32\) >> config.cmake

# Android build related defines.
echo set\(ANDROID_ABI arm64-v8a\) >> config.cmake
echo set\(ANDROID_PLATFORM android-28\) >> config.cmake
echo set\(MACHINE_NAME aarch64-linux-gnu\) >> config.cmake
Additionally we can push below config to compile with OpenCLML support.
export ADRENO_OPENCL=<Path to OpenCLML SDK>
echo set\(USE_CLML "${ADRENO_OPENCL}"\) >> config.cmake
echo set\(USE_CLML_GRAPH_EXECUTOR "${ADRENO_OPENCL}"\) >> config.cmake
For Android target build ANDROID_NDK_HOME is a dependency and we should have the same in the enviromnet variable.
Below commands will build Adreno™ target components
cmake -DCMAKE_TOOLCHAIN_FILE="${ANDROID_NDK_HOME}/build/cmake/android.toolchain.cmake" \
   -DANDROID_ABI=arm64-v8a \
   -DANDROID_PLATFORM=android-28 \
   -DCMAKE_SYSTEM_VERSION=1 \
   -DCMAKE_FIND_ROOT_PATH="${ADRENO_OPENCL}" \
   -DCMAKE_FIND_ROOT_PATH_MODE_PROGRAM=NEVER \
   -DCMAKE_FIND_ROOT_PATH_MODE_LIBRARY=ONLY \
   -DCMAKE_CXX_COMPILER="${ANDROID_NDK_HOME}/toolchains/llvm/prebuilt/linux-x86_64/bin/aarch64-linux-android28-clang++" \
   -DCMAKE_C_COMPILER="${ANDROID_NDK_HOME}/toolchains/llvm/prebuilt/linux-x86_64/bin/aarch64-linux-android28-clang" \
   -DMACHINE_NAME="aarch64-linux-gnu" ..

make tvm_runtime tvm_rpc rtvm
RPC Setup
RPC Setup allows remote target access over TCP/IP networking interface. RPC Setup is essential for auto tuning stage as tuning involves running of auto generated kernels on real device and optimize the same by using machine learning approach. Please refer Auto-Tune with Templates and AutoTVM got more details about AutoTVM.
RPC Setup is also useful to deply the compiled model to a remote device from python interface or tvmc tool from host device.
RPC Setup has multiple components as listed below.
TVM Tracker: TVM tracker is a host side daemon that manages remote devices and serve them to host side applications. Applications can connect to this tracker and acquire a remote device handle to communicate.
TVM RPC: TVM RPC is a native application that runs on the remote device (Android in our case) and registers itself to the TVM Tracker running on the host.
Hence, for RPC based setup we will have above components running on host and target device. Below sections explain how to setup the same manually and also inside docker using automated tools.
Automated RPC Setup: Here we will explain how to setup RPC in docker environment.
Below command launches tracker in docker environment, where tracker listens on port 9190.
./tests/scripts/ci.py adreno -i # Launch a new shell on the anreno docker
source  tests/scripts/setup-adreno-env.sh -e tracker -p 9190
Now, the below comand can run TVM RPC on remote android device with id abcdefgh.
./tests/scripts/ci.py adreno -i # Launch a new shell on adreno docker.
source  tests/scripts/setup-adreno-env.sh -e device -p 9190 -d abcdefgh
Further, below command can be used to query the RPC setup details on any other docker terminals.
./tests/scripts/ci.py adreno -i # Launch a new shell on adreno docker.
source  tests/scripts/setup-adreno-env.sh -e query -p 9190
Manual RPC Setup:
Please refer to the tutorial How To Deploy model on Adreno for manual RPC environment setup.
This concludes RPC Setup and we have rpc-tracker available on host 127.0.0.1 (rpc-tracker) and port 9190 (rpc-port).
Commandline Tools
Here we describe entire compilation process using command line tools. TVM has command line utility tvmc to perform model import, auto tuning, compilation and deply over rpc. tvmc has many options to explore and try.
Model Import & Tuning:
Use the below command to import a model from any framework and auto tune the same.
Here we use a model from Keras and it uses RPC setup for tuning and finally generates tuning log file
keras-resnet50.log.
python3 -m tvm.driver.tvmc tune --target="opencl -device=adreno" \
--target-host="llvm -mtriple=aarch64-linux-gnu" \
resnet50.h5 -o \
keras-resnet50.log \
--early-stopping 0 --repeat 30 --rpc-key android \
--rpc-tracker 127.0.0.1:9190 --trials 1024 \
--tuning-records keras-resnet50-records.log --tuner xgb
Model Compilation:
Use below command for compiling the model and produce TVM compiler outputs.
python3 -m tvm.driver.tvmc compile \
--cross-compiler ${ANDROID_NDK_HOME}/toolchains/llvm/prebuilt/linux-x86_64/bin/aarch64-linux-android28-clang \
--target="opencl, llvm" --target-llvm-mtriple aarch64-linux-gnu --target-opencl-device adreno \
--tuning-records keras-resnet50.log -o keras-resnet50.tar resnet50.h5
While enabled OpenCLML offloading we need to add target clml as shown below. Tuning log is valid for OpenCLML offloading also
as the OpenCL path is fallback option for any operator didn’t go through OpenCLML path. The tuning log will be used for such operators.
python3 -m tvm.driver.tvmc compile \
--cross-compiler ${ANDROID_NDK_HOME}/toolchains/llvm/prebuilt/linux-x86_64/bin/aarch64-linux-android28-clang \
--target="opencl, clml, llvm" --desired-layout NCHW --target-llvm-mtriple aarch64-linux-gnu --target-opencl-device adreno \
--tuning-records keras-resnet50.log -o keras-resnet50.tar resnet50.h5
On successful compilation, above command produce keras-resnet50.tar.
It is a compressed archive with kernel shared lib(mod.so), graph json(mod.json) and params binary(mod.params).
Deploy & Run on Target:
Running the compiled model on Android target is possible in RPC way as well as native deployment.
We can use below tvmc command to deploy on remore target via RPC based setup.
python3 -m tvm.driver.tvmc run --device="cl" keras-resnet50.tar \
--rpc-key android --rpc-tracker 127.0.0.1:9190 --print-time
tvmc based run has more options to initialize the input in various modes like fill, random ..etc.
tvmc based deployment generally a quick verification of compiled model on target from remote host via RPC setup.
Production generally uses native deploymenmt environment like Android JNI or CPP native environments.
Here we need to use cross compiled tvm_runtime interface to deploy the tvm compilation output, i.e. TVMPackage.
TVM has a standalone tool rtvm to deploy and run the model natively on ADB shell. The build process produces this tool under build-adreno-target.
Please refer to rtvm for more details about this tool.
While integrating inside existing Android application TVM has multiple options. For JNI or CPP native we may use C Runtime API
You may refer to rtvm’s simplified interface TVMRunner also.
Python Interface
This section explains importing, auto tuning, compiling and running a model using python interface.TVM has a high level interface through tvmc abstraction as well as low level relay api. We will discuss about both of these in details.
TVMC Interface:
While using tvmc python interface we first load a model that produces TVMCModel. TVMCModel will be used for Auto Tuning to produce tuning cache.
Compilation process uses TVMCModel and tuning cache (optional) to produce TVMCPackage. Now, TVMCPackage will be saved to file system or
can be used to deploy and run on target device.
Please refer to the tutorial for the same How To Deploy model on Adreno using TVMC
Saved TVMCPackage can be used for native deployment using rtvm utility too.
Also, please refer to tvmc documentation for more details about the api interface.
Relay Interface:
Relay api interface gives lower level api access to the tvm compiler interface.
Similar to tvmc interface relay api interface provides various frontend API to convert models to a relay Module.
Relay Module will be used for all kinds transforms like precision conversions, CLML offloading and other custom transforms if any.
The resulting Module will be used for Auto Tuning too. Finally, we use relay.build API to generate library module.
From this library module, we can export compilation artifacts like module shared library (mod.so), params(mod.params) and json graph(mod.json).
This library module will be used to create graph runtime to deploy and run on target device.
Please refer to the tutorial How To Deploy model on Adreno for a step by step explanation of the same.
Additionally, TVM also supports Java interface through TVM4J
Application Integration
TVM compilation output is represented as module shared lib (mod.so), graph json(mod.json) and params (mod.params). Archived representation of TVMPackage is also contains the same.
In general a CPP/C based interface will be sufficient for any Android application integration.
TVM natively expose c_runtime_api for loading a TVM compiled module and run the same.
Alternatively one may refer to cpp_rtvm
TVMRunner interface too for further simplified version of the same.
Advanced Usage
This section details some of the advanced usage and additional information while using Adreno™ target on TVM.
Generated Source Inspection
Apart from standard tvm compilation artifacts kernel library (mod.so), graph (mod.json) and params (mod.params) we can also generate opencl kernel source, clml offloaded graph …etc from lib handle as shown below. TVM compilation output is organized as a TVM module and many other TVM modules imported into it.
Below snippet can dump CLML sub graphs in json format.
# Look for "clml" typed module imported.
clml_modules = list(filter(lambda mod: mod.type_key == "clml", lib.get_lib().imported_modules))
# Loop through all clml sub graphs and dump the json formatted CLML sub graphs.
for cmod in clml_modules:
    print("CLML Src:", cmod.get_source())
Similarly, below snippet can extract opencl kernel source from the compiled TVM module.
# Similarly we can dump open kernel source too as shown below
# Look for "opencl" typed module imported.
opencl_modules = list(filter(lambda mod: mod.type_key == "opencl", lib.get_lib().imported_modules))
# Now dump kernel source for each OpenCL targetted sub graph.
for omod in opencl_modules:
    print("OpenCL Src:", omod.get_source())
Precisions
The right choice of precision for a specific workload can greatly increase the efficiency of the solution, shifting the initial balance of precision and speed to the side that is a priority for the problem.
We can choose from float16, float16_acc32 (Mixed Precision), float32 (standard).
Float16
To leverage the GPU hardware capabilities and utilize the benefits of half precision computation and memory management, we can convert an original model having floating points operation to a model operating with half precision. Choosing lower precision will positively affect the performance of the model, but it may also have a decrease in the accuracy of the model.
To do the conversion you need to call adreno specific transformation API as soon as relay module is generated through any frontend.
from tvm.driver.tvmc.transform import apply_graph_transforms
mod  = apply_graph_transforms(
         mod,
         {
             "mixed_precision": True,
             "mixed_precision_ops": ["nn.conv2d", "nn.dense"],
             "mixed_precision_calculation_type": "float16",
             "mixed_precision_acc_type": "float16",
         },
     )
tvm.driver.tvmc.transform.apply_graph_transforms is simplified API over ToMixedPrecision pass to get desired precision.
We can then compile our model in any convinient way
with  tvm.transform.PassContext(opt_level=3):
    lib = relay.build(
        mod, target_host=target_host, target=target, params=params
    )
While using tvmc python interface, the below arguments enables precision conversion to float16.
mixed_precision = True,
mixed_precision_ops = ["nn.conv2d", "nn.dense"],
mixed_precision_calculation_type = "float16",
mixed_precision_acc_type = "float16"
Similarly, tvmc command line interface option bas below listed options.
--mixed-precision
--mixed-precision-ops nn.conv2d nn.dense
--mixed-precision-calculation-type float16
--mixed-precision-acc-type float16
float16_acc32 (Mixed Precision)
ToMixedPrecision pass traverse over the network and split network to clusters of ops dealing with float or float16 data types.
The clusters are defined by three types of operations:
- Operations always be converted into float16 data type
- Operations which can be converted if they followed by converted cluster
- Operations never be converted to the float16 data type
This list is defined in the ToMixedPrecision implementation here
relay/transform/mixed_precision.py
and can be overridden by user.
The ToMixedPrecision method is a pass to convert an FP32 relay graph into an FP16 version (with
FP16 or FP32 accumulation dtypes). Doing this transformation is useful for reducing model size
as it halves the expected size of the weights (FP16_acc16 case).
ToMixedPrecision pass usage is simplified into a simple call as shown below for usage.
from tvm.driver.tvmc.transform import apply_graph_transforms
mod  = apply_graph_transforms(
         mod,
         {
             "mixed_precision": True,
             "mixed_precision_ops": ["nn.conv2d", "nn.dense"],
             "mixed_precision_calculation_type": "float16",
             "mixed_precision_acc_type": "float32",
         },
     )
tvm.driver.tvmc.transform.apply_graph_transforms is simplified API over ToMixedPrecision pass to get desired precision.
We can then compile our model in any convinient way
with  tvm.transform.PassContext(opt_level=3):
    lib = relay.build(
        mod, target_host=target_host, target=target, params=params
    )
While using tvmc python interface, the below arguments enables precision conversion to float16.
mixed_precision = True,
mixed_precision_ops = ["nn.conv2d", "nn.dense"],
mixed_precision_calculation_type = "float16",
mixed_precision_acc_type = "float32"
Similarly, tvmc command line interface option bas below listed options.
--mixed-precision
--mixed-precision-ops nn.conv2d nn.dense
--mixed-precision-calculation-type float16
--mixed-precision-acc-type float32